By default, the address of your Help Center is a Zendesk subdomain, such as “mycompany” in mycompany.zendesk.com. The host mapping feature allow you to map a subdomain of your own domain (for example, support.mycompany.com) to your default Zendesk address.
A host-mapped Help Center address has the following format:

Host mapping doesn’t affect the URL of the agent interface. It only affects the external-facing URL of Help Center.
You can’t modify your support address to direct to a specific page within your subdomain, such as mycompany.com/community/hc.
Registering a domain name
If you don’t already have a domain name, register one and add a support-related subdomain to it.
-
Purchase and register a domain name with a domain registrar.
You can purchase and register a domain name from any domain registrar, including GoDaddy, Yahoo! Domains, Namecheap, 1&1, Netregistry, or Register.com.
-
After registering the domain name, use the registrar’s tools to add a support-related subdomain such as “support” or “help” or something along those lines. You’ll make the subdomain an alias of your default Zendesk address in the next section.
See the Help on the registrar’s website for instructions on adding a subdomain.
Working with domain names and subdomains can be confusing because it’s something most of us rarely do. Consult your system administrator, if you have one, before proceeding.
Making the subdomain an alias of your default address
The next step is to make your chosen subdomain an alias of your default Zendesk address. An alias is simply an alternate address for a website. For example, you can make the addresses support.mycompany.com and mycompany.zendesk.com interchangeable as far as browsers are concerned.
You need to create a CNAME record on your domain registrar’s website to create the alias. If you have any concerns, consult your system administrator before proceeding.
To make your subdomain an alias of your default Zendesk address:
- Sign in to your domain registrar’s control panel.
-
Look for the option to change DNS records.
The option might be called something like DNS Management, Name Server Management, or Advanced Settings.
-
Locate the CNAME records for your domain.
A CNAME record, or Canonical Name record, is a type of alias used by the Domain Name System (DNS). Among other things, a CNAME record can be used to make a subdomain an alias of an external website.
- Do one of the following:
- If you don’t have a CNAME record for your subdomain yet, look for an option to add a new record.
- If you already have a CNAME record for your subdomain, look for an option to edit the record.
-
Point the CNAME record from your subdomain (shown in the Host Record field in the example below) to your Zendesk subdomain (shown in the Points To field).

The UI and terminology may vary depending on your registrar, but the concepts are the same.
It may take time for changes to the DNS system to be implemented. Typically, it can take anywhere from a few hours to a day, depending on your Time To Live (TTL) settings in the registrar’s control panel. In the example above, the TTL is 14,400 seconds, or 4 hours.
Specifying a new address
After making your subdomain an alias of your default Zendesk address, you need to specify the new address in your instance of Zendesk Support. If you don’t complete this step, your new address will point to a Zendesk error page.
The instructions in this section apply if you only have one brand. If you added multiple brands, specify your addresses in Manage > Brands instead of Settings > Account. See Adding multiples brands.
- Click the Admin icon (
 ) in the sidebar, then select Settings > Account.
 - Select the Branding tab at the top of the page.
-
Scroll down to the Host Mapping section and enter your subdomain and domain name.
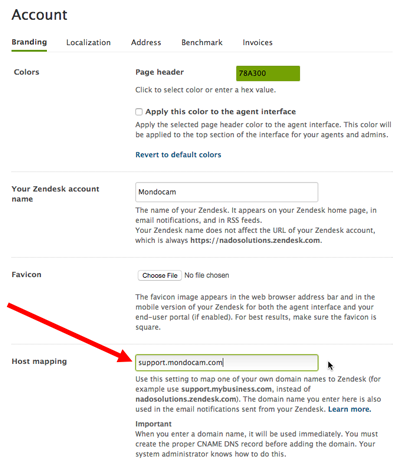
- Click Save Tab.
The final step is to set up hosted SSL.
Comments
0 comments
Please sign in to leave a comment.